Experiments With JavaFX 3D Scenes
By Weiqi Gao, OCI Principal Software Engineer
May 2012
Introduction
JavaFX is the next step in the evolution of Java as a rich client platform. Announced in 2007, JavaFX 1.0 was delivered in 2008 with a domain specific language for GUI construction called JavaFX Script as the entry point to the JavaFX runtime. A major shift in strategy away from the JavaFX Script language in favor of a set of plain Java APIs was announces in 2010 and delivered in 2011 as JavaFX 2.0. This move made JavaFX easily available to all Java programmers as well as programmers of other JVM languages such as Scala, Groovy, Clojure, and Jython. The JavaFX Script language was deemphasized by the JavaFX team at Oracle, but is picked up by the open source community under the new name Visage.
Since JavaFX 2.0, the JavaFX team has announced the intention to open source the JavaFX technology and indeed several subsystems, including the controls library, has already been contributed to the openjfx project under the OpenJDK umbrella project. It has further been announced that JavaFX technology will be integrated into the upcoming Java 8 release. As a consequence, JavaFX will become the focal point of rich client application development for the Java platform.
JavaFX 2.1 was released on April 26, 2012, just as I was reviewing the final draft of this article. This release brings in Max OS X as a supported operating system for JavaFX. This release coincides with the release of JDK 7 Update 4, which also added Max OS X support. What is more, the JavaFX 2.1 SDK is included in the JDK 7 Update 4 installation for both Windows and Mac OS X.
Key innovations of the JavaFX technology include its hardware accelerated graphics system, its media support, its properties and bindings framework, its HTML5 support through the Webkit based WebEngine and WebView, and its animation framework. Most of these are well covered in the JavaFX online documentation, the two books on JavaFX 2.x so far—JavaFX 2.0 Introduction by Example by Carl Dea, and Pro JavaFX 2 by James Weaver, myself, Stephen Chin, Dean Iverson and Johan Vos—and the popular JavaFX blogs.
In this short article, I will explore an area of JavaFX 2.x that is not as well covered as the other popular features such as the properties and bindings framework or the animation framework, but nevertheless is just as fascinating and is capable of creating beautiful visual displays. This area is JavaFX 3D scenes. I will show you JavaFX 3D scenes in action through a series of simple examples. And along the way I will explain some of the other JavaFX features I employed in the examples, including the use of the JavaFX 2.x builders, properties and bindings, and animations.
Setting Up a JavaFX 2 Development Environment
The development environment for JavaFX 2.x consists of a supported operating system, the JDK, the JavaFX SDK, and a Java IDE. Windows is supported since JavaFX 2.0. Mac OS X support is added in the just released JavaFX 2.1. Linux support is available as a developer preview in JavaFX 2.1 and 2.2, and will go GA in JavaFX 2.2 later in 2012.
My setup for writing this article is a Mac mini running Mac OS X Lion, JDK 1.6.0_31 for Mac OS X, JavaFX 2.2 SDK developer preview build b04, and IntelliJ IDEA 11.1.1. I setup a normal Java project in the IDE and add the JavaFX runtime jar, found in rt/lib/jfxrt.jar under the JavaFX SDK installation directory, as a dependency. After the JDK 7 Update 4 and JavaFX 2.1 release, I tested all the programs in JDK 7 Update 4 and everything worked. With JDK 7 Update 4, you don't need a separate JavaFX download.
To verify that my environment works, I compiled and ran the following small program:
- package com.ociweb.sett.javafx;
-
- import javafx.animation.KeyFrame;
- import javafx.animation.KeyValue;
- import javafx.animation.Timeline;
- import javafx.animation.TimelineBuilder;
- import javafx.application.Application;
- import javafx.beans.property.DoubleProperty;
- import javafx.beans.property.SimpleDoubleProperty;
- import javafx.scene.GroupBuilder;
- import javafx.scene.Parent;
- import javafx.scene.Scene;
- import javafx.scene.SceneBuilder;
- import javafx.scene.paint.Color;
- import javafx.scene.shape.Rectangle;
- import javafx.scene.shape.RectangleBuilder;
- import javafx.stage.Stage;
- import javafx.util.Duration;
-
- public class HelloJavaFX extends Application {
- private DoubleProperty translate = new SimpleDoubleProperty();
-
- public static void main(String[] args) {
- launch(args);
- }
-
- @Override
- public void start(Stage stage) {
- stage.setTitle("Hello JavaFX");
- stage.setScene(makeScene());
- stage.show();
- animate();
- }
-
- private Scene makeScene() {
- return SceneBuilder.create()
- .width(500)
- .height(500)
- .root(createRoot())
- .build();
- }
-
- private Parent createRoot() {
- Rectangle node1 = RectangleBuilder.create()
- .x(0)
- .y(0)
- .width(10)
- .height(10)
- .fill(Color.RED)
- .build();
-
- Rectangle node2 = RectangleBuilder.create()
- .x(0)
- .y(0)
- .width(10)
- .height(10)
- .fill(Color.GREEN)
- .build();
-
- Rectangle node3 = RectangleBuilder.create()
- .x(0)
- .y(0)
- .width(10)
- .height(10)
- .fill(Color.BLUE)
- .build();
-
- node1.translateXProperty().bind(translate);
- node2.translateYProperty().bind(translate);
- node3.translateZProperty().bind(translate);
-
- return GroupBuilder.create()
- .children(node1, node2, node3)
- .translateX(250)
- .translateY(250)
- .build();
- }
-
- private void animate() {
- TimelineBuilder.create()
- .cycleCount(Timeline.INDEFINITE)
- .keyFrames(
- new KeyFrame(
- Duration.seconds(0),
- new KeyValue(translate, -250)
- ),
- new KeyFrame(
- Duration.seconds(2),
- new KeyValue(translate, 250)
- )
- )
- .build().play();
- }
- }
Before I point out which line of code uses 3D features of JavaFX, let me briefly explain some basic JavaFX application code idioms.
- The
Applicationclass - The
Applicationclass provides the application lifecycle methodsinit(),start(Stage), andstop(). Onlystart(Stage)is abstract and must be overridden. This method injects aStageinto the application.Stageis an application window. launch(args)inmain()launch(String[])is a static method inApplication. It will get the JavaFX rumtine going, and eventually callsstart(Stage)on the GUI thread named "JavaFX Application Thread"- The builder classes
- JavaFX provides builder classes for many types of objects that you may want to create. The builder code
RectangleBuilder.create()
    .x(0)
    .y(0)
    .width(10)
    .height(10)
    .fill(Color.RED)
    .build();
is equivalent to the "normal" code
Rectangle node1 = new Rectangle();
node1.setX(0);
node1.setY(0);
node1.setWidth(10);
node1.setHeight(10);
node1.setFill(Color.RED);- The builder code is more concise and is more descriptive than normal code, especially code that calls a constructor with unnamed parameters.
- Properties
- JavaFX properties and bindings framework is the most fun part of JavaFX code. It allows a property of one object to be bound to another property somewhere else so that whenever the latter changes, the former is notified and, at the appropriate time, updated.
- Animation
- JavaFX supports key frame animations, which allows you to specify the value of a property at certain specified time points. The JavaFX animation framework interpolates the values of the property at intermediate times.
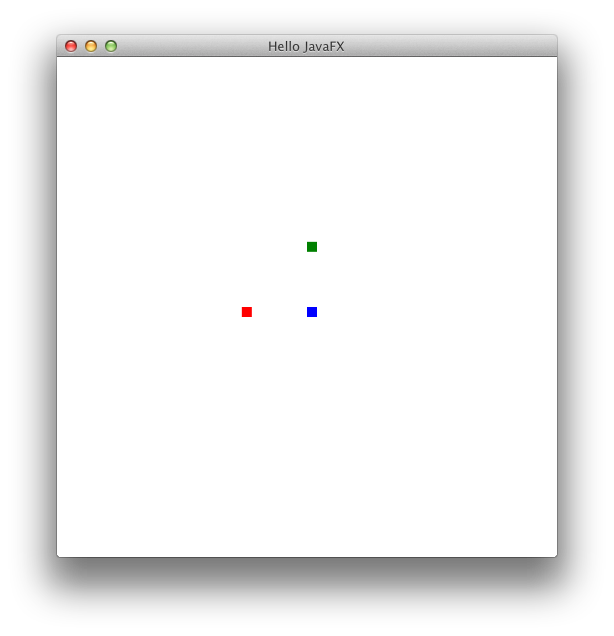
The HelloJavaFX program will create a window of size 500×500, and three small rectangles of size 10×10: one red, one green, and one blue. The translateXProperty of the red rectangle, the translateYProperty of the green rectangle, and the translateZProperty of the blue rectangle are bound to the same DoubleProperty called translate. The translate property is then animated for a duration of 2 seconds with two key frames: at time 0, the value of translate is -250; at time 2 seconds, the value of translate is 250. The three rectangles as a whole is translated 250 along the x-axis, and 250 along the y-axis, just so that we can see the rectangles when their coordinates are negative.
3D Scenes in JavaFX
For readers who ask "Where is the 3D code?" It's this line:
node3.translateZProperty().bind(translate);Even though node3 is a two-dimensional rectangle, you can manipulate its coordinates in three-dimensional space. Two-dimensional objects manipulated in three-dimensional space, that is the state of 3D scenes in JavaFX. Full 3D objects are in the roadmap for future versions of JavaFX.
"But the blue rectangle did not move at all. And the scene definitely looks two-dimensional." It looks two-dimensional because of two things: we are looking at the scene in the z-axis direction, and we are using a parallel camera. Every scene has a camera. It defaults to a parallel camera, which renders objects at the same size regardless of its distance from the viewer. Let's put a PerspectiveCamera on the scene:
private Scene makeScene() {
    return SceneBuilder.create()
        .width(500)
        .height(500)
        .root(createRoot())
        .camera(PerspectiveCameraBuilder.create()
            .build())
        .build();
}
[video functionality removed since original publication]
Even though the blue rectangle still only occupies the center of the screen, its size does change from larger to smaller as its z coordinate is translated from -250 to 250. Since under a perspective camera, nearer object looks bigger, we can conclude that the positive z-axis direction is pointing into the screen and away from the viewer. Together with the observation that the red rectangle animates from the left of the window towards the right of the window, and that the green rectangle animates from the top of the window towards the bottom of the window, we infer the orientation of the coordinate system to be: x increases from left to right, y increases from top to bottom, and z increases from closer to the viewer to further away from the viewer. This gives us a right-hand orientation of the three-dimensional space: if you stretch out the first three fingers of your right hand, and point your thumb along the positive x-axis and your index finger along the positive y-axis, then your middle finger points to the positive z-axis.
If you do not see the changing size of the blue rectangle after adding a perspective camera to the scene, the graphics card on your computer may not be one supported by JavaFX. This line of code:
Platform.isSupported(ConditionalFeature.SCENE3D)will return true if your hardware supports 3D scenes. The rest of this article depends on your hardware supporting 3D scenes.
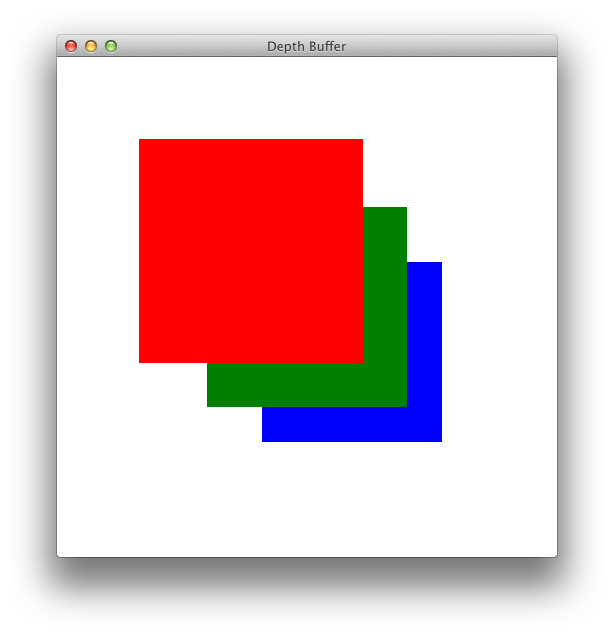
The Depth Buffer
Without any further transforms, all JavaFX on screen objects such as controls and shapes fall on the xy-plane where the z coordinate is 0. Normally, these objects are drawn in the order in which they are put into the scene, and later added objects will obscure earlier added ones.
- package com.ociweb.sett.javafx;
-
- import javafx.application.Application;
- import javafx.scene.GroupBuilder;
- import javafx.scene.Parent;
- import javafx.scene.PerspectiveCameraBuilder;
- import javafx.scene.Scene;
- import javafx.scene.SceneBuilder;
- import javafx.scene.paint.Color;
- import javafx.scene.shape.Rectangle;
- import javafx.scene.shape.RectangleBuilder;
- import javafx.stage.Stage;
-
- public class DepthBuffer extends Application {
- public static void main(String[] args) {
- launch(args);
- }
-
- @Override
- public void start(Stage stage) {
- stage.setTitle("Depth Buffer");
- stage.setScene(makeScene());
- stage.show();
- }
-
- private Scene makeScene() {
- return SceneBuilder.create()
- .width(500)
- .height(500)
- .root(createRoot())
- .camera(PerspectiveCameraBuilder.create()
- .build())
- .build();
- }
-
- private Parent createRoot() {
- Rectangle node1 = RectangleBuilder.create()
- .x(-150)
- .y(-150)
- .width(200)
- .height(200)
- .fill(Color.RED)
- .build();
-
- Rectangle node2 = RectangleBuilder.create()
- .x(-100)
- .y(-100)
- .width(200)
- .height(200)
- .fill(Color.GREEN)
- .build();
-
- Rectangle node3 = RectangleBuilder.create()
- .x(-50)
- .y(-50)
- .width(200)
- .height(200)
- .fill(Color.BLUE)
- .build();
-
- return GroupBuilder.create()
- .children(node1, node2, node3)
- .translateX(250)
- .translateY(250)
- .build();
- }
- }
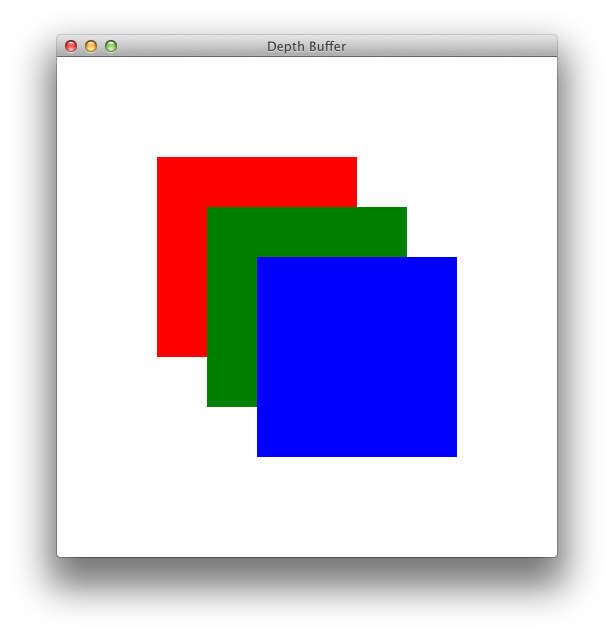
This is only slightly different from the previous experiment. We changed the size and location of the red, green and blue rectangles so that they are bigger and overlapping. Since order of the three rectangles in the container is node1, node2, node3, the green rectangle obscures a portion of the red rectangle, and the blue one obscures a portion of the green one. The scene will be drawn differently if we add the rectangles in a different order:
return GroupBuilder.create()
    .children(node3, node2, node1)
    .translateX(250)
    .translateY(250)
    .build();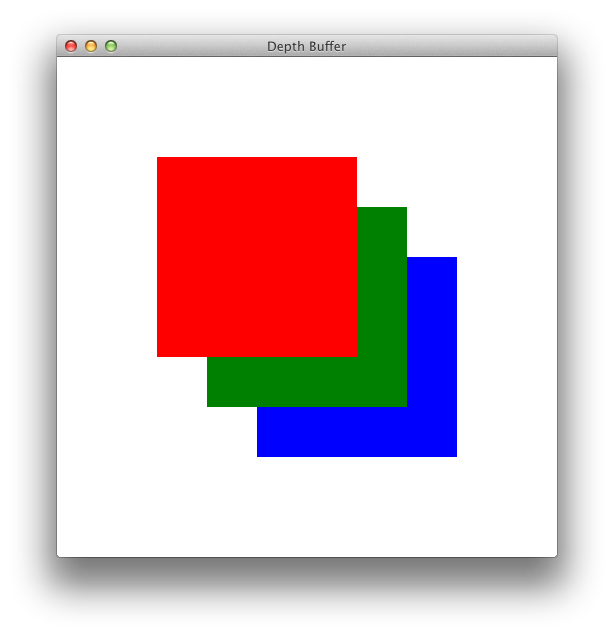
Now we revert the order back to node1, node2, node3 and change the z coordinates of the three rectangles so that the red rectangle is at z = -100, the green one remains at z = 0, and the blue one is at z = 100.
Rectangle node1 = RectangleBuilder.create()
    .x(-150)
    .y(-150)
    .translateZ(-100)
    .width(200)
    .height(200)
    .fill(Color.RED)
    .build();

Rectangle node2 = RectangleBuilder.create()
    .x(-100)
    .y(-100)
    .width(200)
    .height(200)
    .fill(Color.GREEN)
    .build();

Rectangle node3 = RectangleBuilder.create()
    .x(-50)
    .y(-50)
    .translateZ(100)
    .width(200)
    .height(200)
    .fill(Color.BLUE)
    .build();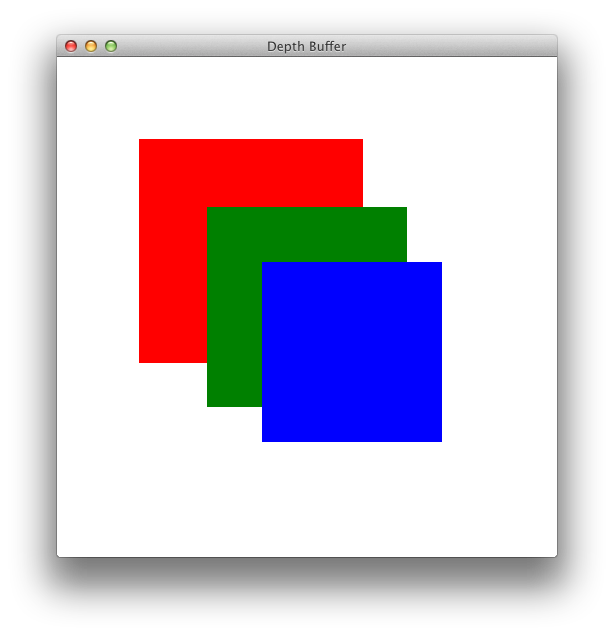
Build and run the program and you will see the red rectangle becoming bigger because it is closer to the viewer, the green rectangle remaining the same size, and the blue one becoming smaller because it is further away from the viewer. However, contrary to our intuition, the green rectangle still obscures a portion of the red one, and the blue one the green.
To fix this problem, we must tell the scene to use the depth buffer, which will cause the objects to be drawn by their distance from the viewer. Further away objects will be drawn first, and nearer objects will be drawn later.
It is easy enough to enable the depth buffer on the scene:
private Scene makeScene() {
    return SceneBuilder.create()
        .width(500)
        .height(500)
        .root(createRoot())
        .camera(PerspectiveCameraBuilder.create()
            .build())
        .depthBuffer(true)
        .build();
}
Now the scene looks realistic. We can animate the z coordinates of the three rectangles so that their z-ordering changes during the animation to see one rectangle jumps in front another. To do that, we add property fields to the class:
public class DepthBuffer extends Application {
    private DoubleProperty translateZForNode1 = new SimpleDoubleProperty();
        private DoubleProperty translateZForNode2 = new SimpleDoubleProperty();
        private DoubleProperty translateZForNode3 = new SimpleDoubleProperty();
trigger the animation from the start(Stage) method:
@Override
public void start(Stage stage) {
    stage.setTitle("Depth Buffer");
    stage.setScene(makeScene());
    stage.show();
    animate();
}
bind the translateZProperty's of the rectangles to the property fields:
node1.translateZProperty().bind(translateZForNode1);
    node2.translateZProperty().bind(translateZForNode2);
    node3.translateZProperty().bind(translateZForNode3);

return GroupBuilder.create()
    .children(node1, node2, node3)
    .translateX(250)
    .translateY(250)
    .build();
and implement the animate() method:
private void animate() {
    TimelineBuilder.create()
        .cycleCount(Timeline.INDEFINITE)
        .autoReverse(true)
        .keyFrames(
            new KeyFrame(
                Duration.seconds(0),
                new KeyValue(translateZForNode1, -100),
                new KeyValue(translateZForNode2, -10),
                new KeyValue(translateZForNode3, 100)
            ),
            new KeyFrame(
                Duration.seconds(2),
                new KeyValue(translateZForNode1, 100),
                new KeyValue(translateZForNode2, 90),
                new KeyValue(translateZForNode3, -100)
            )
        )
        .build().play();
}
[video functionality removed since original publication]
3D Transforms
As I mentioned earlier, the power of JavaFX's 3D scenes comes from its 3D transforms. JavaFX's transforms consist of the most general Affine transform, and four special case transforms: Translate, Scale, Rotate, and Shear. You have seen plenty of Translate's in the last section. They move objects in a particular direction. Scale expands or contracts an object by an factor. Both Translate's and Scale's are easy to imagine.
Rotate transforms have the most dramatic effect on the scene as it rotates the scene about a straight line. When you apply a Rotate transform to an object, it rotates the object around its center. You can also specify a different pivot point to rotate around. For 2D rotations, you need to specify an angle of rotation in degrees and the object will be rotated around the pivot point in a clockwise direction. For 3D rotations, you also need to specify a rotation axis. The rotation axis is represented by a Point3D object. The rotation will be done around a straight line in the 3-dimensional space that passes through the pivot point and points in the direction of the axis vector. The direction of the rotation follow the right-hand rule: Stretch out your thumb and bend your four fingers as if to grab something, if you point your thumb in the direction of the axis, then your four fingers will point to the direction of the rotation.
Here is an example of a Rotate transform:
Rotate rotate = RotateBuilder.create()
    .angle(60)
    .pivotX(0)
    .pivotY(0)
    .pivotZ(0)
    .axis(new Point3D(1, 0, 0))
    .build();
This Rotate transform will cause the object it is applied to to rotate around the x-axis by 60°.
The experiment of this section is a slight modification of the experiment from the last section. I have changed the colored rectangles into colored circles to stop you from being bored. I have also added a Rotate transform that is applied to the root, which is a Group that contains all three circles. This causes them to be rotated as a combined unit. I have added another property that is used to animate the rotation.
- package com.ociweb.sett.javafx;
-
- import javafx.animation.KeyFrame;
- import javafx.animation.KeyValue;
- import javafx.animation.Timeline;
- import javafx.animation.TimelineBuilder;
- import javafx.application.Application;
- import javafx.beans.property.DoubleProperty;
- import javafx.beans.property.SimpleDoubleProperty;
- import javafx.geometry.Point3D;
- import javafx.scene.GroupBuilder;
- import javafx.scene.Parent;
- import javafx.scene.PerspectiveCameraBuilder;
- import javafx.scene.Scene;
- import javafx.scene.SceneBuilder;
- import javafx.scene.paint.Color;
- import javafx.scene.shape.Circle;
- import javafx.scene.shape.CircleBuilder;
- import javafx.scene.transform.Rotate;
- import javafx.scene.transform.RotateBuilder;
- import javafx.stage.Stage;
- import javafx.util.Duration;
-
- public class Rotations extends Application {
- private DoubleProperty translateZForNode1 = new SimpleDoubleProperty();
- private DoubleProperty translateZForNode2 = new SimpleDoubleProperty();
- private DoubleProperty translateZForNode3 = new SimpleDoubleProperty();
- <strong>private DoubleProperty angle = new SimpleDoubleProperty();</strong>
-
- public static void main(String[] args) {
- launch(args);
- }
-
- @Override
- public void start(Stage stage) {
- stage.setTitle("Rotations");
- stage.setScene(makeScene());
- stage.show();
- animate();
- }
-
- private Scene makeScene() {
- return SceneBuilder.create()
- .width(500)
- .height(500)
- .root(createRoot())
- .camera(PerspectiveCameraBuilder.create()
- .build())
- .depthBuffer(true)
- .build();
- }
-
- private Parent createRoot() {
- <strong>Circle node1 = CircleBuilder.create()
- .centerX(-50)
- .centerY(-50)
- .radius(100)
- .fill(Color.RED)
- .build();</strong>
-
- <strong>Circle node2 = CircleBuilder.create()
- .centerX(0)
- .centerY(0)
- .radius(100)
- .fill(Color.GREEN)
- .build();</strong>
-
- <strong>Circle node3 = CircleBuilder.create()
- .centerX(50)
- .centerY(50)
- .radius(100)
- .fill(Color.BLUE)
- .build();</strong>
-
- node1.translateZProperty().bind(translateZForNode1);
- node2.translateZProperty().bind(translateZForNode2);
- node3.translateZProperty().bind(translateZForNode3);
-
- <strong>final Rotate rotate = RotateBuilder.create()
- .pivotX(0)
- .pivotY(0)
- .pivotZ(0)
- .axis(new Point3D(1, 0, 0))
- .build();
- rotate.angleProperty().bind(angle);</strong>
-
- return GroupBuilder.create()
- .children(node1, node2, node3)
- .translateX(250)
- .translateY(250)
- <strong>.transforms(rotate)</strong>
- .build();
- }
-
- private void animate() {
- TimelineBuilder.create()
- .cycleCount(Timeline.INDEFINITE)
- .keyFrames(
- new KeyFrame(
- Duration.seconds(0),
- new KeyValue(translateZForNode1, -100),
- new KeyValue(translateZForNode2, -10),
- new KeyValue(translateZForNode3, 100),
- <strong>new KeyValue(angle, 0)</strong>
- ),
- new KeyFrame(
- Duration.seconds(2),
- new KeyValue(translateZForNode1, 100),
- new KeyValue(translateZForNode2, 90),
- new KeyValue(translateZForNode3, -100),
- <strong>new KeyValue(angle, 180)</strong>
- ),
- <strong>new KeyFrame(
- Duration.seconds(4),
- new KeyValue(translateZForNode1, -100),
- new KeyValue(translateZForNode2, -10),
- new KeyValue(translateZForNode3, 100),
- new KeyValue(angle, 360)
- )</strong>
-
- )
- .build().play();
- }
- }
[video functionality removed since original publication]
Build and run the program and you will see the animation that you saw in the last section, compounded with a rotation of the whole scene around the x-axis. The motion of the objects is like the wheel of a car that is driving towards you. Dodge!
We can change the axis of the Rotate transform to that of the y-axis, represented by the directional vector (0, 1, 0):
final Rotate rotate = RotateBuilder.create()
    .pivotX(0)
    .pivotY(0)
    .pivotZ(0)
    .axis(new Point3D(0, 1, 0))
    .build();
rotate.angleProperty().bind(angle);
[video functionality removed since original publication]
This time the rotation will be around the y-axis. As a matter of fact, the Rotate class has constants X_AXIS, Y_AXIS, and Z_AXIS that you can use in this situation. The above snippet of code is equivalent to:
final Rotate rotate = RotateBuilder.create()
    .pivotX(0)
    .pivotY(0)
    .pivotZ(0)
    .axis(Rotate.Y_AXIS)
    .build();
rotate.angleProperty().bind(angle);
Notice that in the midst of all the animated translations and rotation the depth buffer worked flawlessly. Objects closer to us always obscure objects further away, never the other way around.
3D Objects
All the experiments that you have seen so far feels a little bit "flat." And that is because the three rectangles or the three circles that we dealt with are all parallel to each other. Rotate them about different axis, and they will form the surface of a 3D looking solid. Here's a cube, obtained from six squares each of a different color and each of which undergoes a different transform. In the beginning, all six sides were at the same position, but one by one, the side animates to their final position in the cube:
- package com.ociweb.sett.javafx;
-
- import javafx.animation.KeyFrame;
- import javafx.animation.KeyValue;
- import javafx.animation.TimelineBuilder;
- import javafx.application.Application;
- import javafx.beans.property.DoubleProperty;
- import javafx.beans.property.SimpleDoubleProperty;
- import javafx.geometry.Point3D;
- import javafx.scene.GroupBuilder;
- import javafx.scene.Parent;
- import javafx.scene.PerspectiveCameraBuilder;
- import javafx.scene.Scene;
- import javafx.scene.SceneBuilder;
- import javafx.scene.paint.Color;
- import javafx.scene.shape.Rectangle;
- import javafx.scene.shape.RectangleBuilder;
- import javafx.scene.transform.Rotate;
- import javafx.scene.transform.RotateBuilder;
- import javafx.stage.Stage;
- import javafx.util.Duration;
-
- public class Cube extends Application {
- private DoubleProperty side2Angle = new SimpleDoubleProperty();
- private DoubleProperty side3Angle = new SimpleDoubleProperty();
- private DoubleProperty side4Angle = new SimpleDoubleProperty();
- private DoubleProperty side5Angle = new SimpleDoubleProperty();
- private DoubleProperty side6TranslateZ = new SimpleDoubleProperty();
-
- public static void main(String[] args) {
- launch(args);
- }
-
- @Override
- public void start(Stage stage) {
- stage.setTitle("Cube");
- stage.setScene(makeScene());
- stage.show();
- animate();
- }
-
- private Scene makeScene() {
- return SceneBuilder.create()
- .width(500)
- .height(500)
- .root(createRoot())
- .camera(PerspectiveCameraBuilder.create()
- .build())
- .depthBuffer(true)
- .build();
- }
-
- private Parent createRoot() {
- final Rectangle side1 = RectangleBuilder.create()
- .x(-100)
- .y(-100)
- .width(200)
- .height(200)
- .fill(Color.RED)
- .build();
-
- final Rotate side2Rotate = RotateBuilder.create()
- .pivotX(-100)
- .pivotY(-100)
- .pivotZ(0)
- .axis(Rotate.Y_AXIS)
- .build();
- side2Rotate.angleProperty().bind(side2Angle);
-
- final Rectangle side2 = RectangleBuilder.create()
- .x(-100)
- .y(-100)
- .width(200)
- .height(200)
- .fill(Color.GREEN)
- .transforms(side2Rotate)
- .build();
-
- final Rotate side3Rotate = RotateBuilder.create()
- .pivotX(100)
- .pivotY(-100)
- .pivotZ(0)
- .axis(new Point3D(-1, 0, 0))
- .build();
- side3Rotate.angleProperty().bind(side3Angle);
-
- final Rectangle side3 = RectangleBuilder.create()
- .x(-100)
- .y(-100)
- .width(200)
- .height(200)
- .fill(Color.BLUE)
- .transforms(side3Rotate)
- .build();
-
- final Rotate side4Rotate = RotateBuilder.create()
- .pivotX(100)
- .pivotY(100)
- .pivotZ(0)
- .axis(new Point3D(0, -1, 0))
- .build();
- side4Rotate.angleProperty().bind(side4Angle);
-
- final Rectangle side4 = RectangleBuilder.create()
- .x(-100)
- .y(-100)
- .width(200)
- .height(200)
- .fill(Color.CYAN)
- .transforms(side4Rotate)
- .build();
-
- final Rotate side5Rotate = RotateBuilder.create()
- .pivotX(-100)
- .pivotY(100)
- .pivotZ(0)
- .axis(Rotate.X_AXIS)
- .build();
- side5Rotate.angleProperty().bind(side5Angle);
-
- final Rectangle side5 = RectangleBuilder.create()
- .x(-100)
- .y(-100)
- .width(200)
- .height(200)
- .fill(Color.MAGENTA)
- .transforms(side5Rotate)
- .build();
-
- final Rectangle side6 = RectangleBuilder.create()
- .x(-100)
- .y(-100)
- .width(200)
- .height(200)
- .fill(Color.YELLOW)
- .build();
-
- side6.translateZProperty().bind(side6TranslateZ);
-
- return GroupBuilder.create()
- .children(side1, side6, side2, side3, side4, side5)
- .translateX(250)
- .translateY(250)
- .build();
- }
-
- private void animate() {
- TimelineBuilder.create()
- .keyFrames(
- new KeyFrame(
- Duration.seconds(0),
- new KeyValue(side2Angle, 0),
- new KeyValue(side3Angle, 0),
- new KeyValue(side4Angle, 0),
- new KeyValue(side5Angle, 0),
- new KeyValue(side6TranslateZ, 0)
- ),
- new KeyFrame(
- Duration.seconds(1),
- new KeyValue(side2Angle, 0),
- new KeyValue(side3Angle, 0),
- new KeyValue(side4Angle, 0),
- new KeyValue(side5Angle, 90),
- new KeyValue(side6TranslateZ, 0)
- ),
- new KeyFrame(
- Duration.seconds(2),
- new KeyValue(side2Angle, 0),
- new KeyValue(side3Angle, 0),
- new KeyValue(side4Angle, 90),
- new KeyValue(side5Angle, 90),
- new KeyValue(side6TranslateZ, 0)
- ),
- new KeyFrame(
- Duration.seconds(3),
- new KeyValue(side2Angle, 0),
- new KeyValue(side3Angle, 90),
- new KeyValue(side4Angle, 90),
- new KeyValue(side5Angle, 90),
- new KeyValue(side6TranslateZ, 0)
- ),
- new KeyFrame(
- Duration.seconds(4),
- new KeyValue(side2Angle, 90),
- new KeyValue(side3Angle, 90),
- new KeyValue(side4Angle, 90),
- new KeyValue(side5Angle, 90),
- new KeyValue(side6TranslateZ, 0)
- ),
- new KeyFrame(
- Duration.seconds(5),
- new KeyValue(side2Angle, 90),
- new KeyValue(side3Angle, 90),
- new KeyValue(side4Angle, 90),
- new KeyValue(side5Angle, 90),
- new KeyValue(side6TranslateZ, -200)
- )
- )
- .build().play();
- }
- }
[video functionality removed since original publication]
Did you see it? Well, you can see the cube forming as it happens. But because of the viewing angle is directly over the cube, when the animation is done, all you see is the last face of the cube. To cure this dullness, we add a Rotate transform to the root of the scene graph and animate its angle as we form the cube. First we add a property:
public class Cube extends Application {
    private DoubleProperty side2Angle = new SimpleDoubleProperty();
    private DoubleProperty side3Angle = new SimpleDoubleProperty();
    private DoubleProperty side4Angle = new SimpleDoubleProperty();
    private DoubleProperty side5Angle = new SimpleDoubleProperty();
    private DoubleProperty side6TranslateZ = new SimpleDoubleProperty();
    private DoubleProperty rootAngle = new SimpleDoubleProperty();
Then we add a Rotate transform to root, binding its angleProperty to the property defined above:
final Rotate rootRotate = RotateBuilder.create()
    .pivotX(0)
    .pivotY(0)
    .pivotZ(-100)
    .axis(new Point3D(1, 1, 1))
    .build();
rootRotate.angleProperty().bind(rootAngle);

return GroupBuilder.create()
    .children(side1, side6, side2, side3, side4, side5)
    .translateX(250)
    .translateY(250)
    .translateZ(-100)
    .transforms(rootRotate)
    .build();
Notice that the pivot point of the rotation is the center of the cube, which is at (0, 0, -100). We also translated the root along the z-axis so that the rotation's center appears to be at the center of the screen.
Finally, we add rootRotate into the animation mix:
private void animate() {
    TimelineBuilder.create()
        .keyFrames(
            new KeyFrame(
                Duration.seconds(0),
                new KeyValue(side2Angle, 0),
                new KeyValue(side3Angle, 0),
                new KeyValue(side4Angle, 0),
                new KeyValue(side5Angle, 0),
                new KeyValue(side6TranslateZ, 0),
                new KeyValue(rootAngle, -30)
            ),
            new KeyFrame(
                Duration.seconds(1),
                new KeyValue(side2Angle, 0),
                new KeyValue(side3Angle, 0),
                new KeyValue(side4Angle, 0),
                new KeyValue(side5Angle, 90),
                new KeyValue(side6TranslateZ, 0),
                new KeyValue(rootAngle, 30)
            ),
            new KeyFrame(
                Duration.seconds(2),
                new KeyValue(side2Angle, 0),
                new KeyValue(side3Angle, 0),
                new KeyValue(side4Angle, 90),
                new KeyValue(side5Angle, 90),
                new KeyValue(side6TranslateZ, 0),
                new KeyValue(rootAngle, 90)
            ),
            new KeyFrame(
                Duration.seconds(3),
                new KeyValue(side2Angle, 0),
                new KeyValue(side3Angle, 90),
                new KeyValue(side4Angle, 90),
                new KeyValue(side5Angle, 90),
                new KeyValue(side6TranslateZ, 0),
                new KeyValue(rootAngle, 150)
            ),
            new KeyFrame(
                Duration.seconds(4),
                new KeyValue(side2Angle, 90),
                new KeyValue(side3Angle, 90),
                new KeyValue(side4Angle, 90),
                new KeyValue(side5Angle, 90),
                new KeyValue(side6TranslateZ, 0),
                new KeyValue(rootAngle, 210)
            ),
            new KeyFrame(
                Duration.seconds(5),
                new KeyValue(side2Angle, 90),
                new KeyValue(side3Angle, 90),
                new KeyValue(side4Angle, 90),
                new KeyValue(side5Angle, 90),
                new KeyValue(side6TranslateZ, -200),
                new KeyValue(rootAngle, 330)
            )
        )
        .build().play();
}
[video functionality removed since original publication]
Build and run the program and you will see the forming of the cube more clearly. If you have never done this sort of programs before, you have to admit it's pretty cool.
Platonic Solids
The cube is one of five Platonic solids. Platonic solids are regular convex polyhedrons whose faces are congruent regular polygons. There are five Platonic solids: the tetrahedron (4 faces, each a equilateral triangle), the hexahedron (or the cube, 6 faces, each a square), octahedron (8 faces, each a triangle), dodecahedron (12 faces, each a pentagon), and icosahedron (20 faces, each a triangle.)
Using the same trick from the last section we can construct the other Platonic solids. I'll show you a tetrahedron. The only difference between the tetrahedron and the cube is that instead of using six squares, we use four equilateral triangles, and instead of rotating the squares out by 90°, we rotate the triangles out by 70.53°—the dihedral angle of the tetrahedron.
- package com.ociweb.sett.javafx;
-
- import javafx.animation.KeyFrame;
- import javafx.animation.KeyValue;
- import javafx.animation.TimelineBuilder;
- import javafx.application.Application;
- import javafx.beans.property.DoubleProperty;
- import javafx.beans.property.SimpleDoubleProperty;
- import javafx.geometry.Point3D;
- import javafx.scene.GroupBuilder;
- import javafx.scene.Parent;
- import javafx.scene.PerspectiveCameraBuilder;
- import javafx.scene.Scene;
- import javafx.scene.SceneBuilder;
- import javafx.scene.paint.Color;
- import javafx.scene.shape.Polygon;
- import javafx.scene.shape.PolygonBuilder;
- import javafx.scene.transform.Rotate;
- import javafx.scene.transform.RotateBuilder;
- import javafx.stage.Stage;
- import javafx.util.Duration;
-
- public class Tetrahedron extends Application {
- public static final double DIHEDRAL_ANGLE = 70.53;
- public static final double INRADIUS = 50 * Math.tan(DIHEDRAL_ANGLE / 2 / 180 * Math.PI);
-
- private DoubleProperty side2Angle = new SimpleDoubleProperty();
- private DoubleProperty side3Angle = new SimpleDoubleProperty();
- private DoubleProperty side4Angle = new SimpleDoubleProperty();
- private DoubleProperty rootAngle = new SimpleDoubleProperty();
-
- public static void main(String[] args) {
- launch(args);
- }
-
- @Override
- public void start(Stage stage) {
- stage.setTitle("Tetrahedron");
- stage.setScene(makeScene());
- stage.show();
- animate();
- }
-
- private Scene makeScene() {
- return SceneBuilder.create()
- .width(500)
- .height(500)
- .root(createRoot())
- .camera(PerspectiveCameraBuilder.create()
- .build())
- .depthBuffer(true)
- .build();
- }
-
- private Parent createRoot() {
- double x[] = new double[3];
- double y[] = new double[3];
- double angle = 2 * Math.PI / 3;
- for (int i = 0; i < 3; i++) {
- x[i] = 100 * Math.cos(i * angle);
- y[i] = 100 * Math.sin(i * angle);
- }
-
- final Polygon side1 = PolygonBuilder.create()
- .points(x[0], y[0], x[1], y[1], x[2], y[2])
- .fill(Color.RED)
- .opacity(0.9)
- .build();
-
- final Rotate side2Rotate = RotateBuilder.create()
- .pivotX(x[0])
- .pivotY(y[0])
- .pivotZ(0)
- .axis(new Point3D(x[0] - x[1], y[0] - y[1], 0))
- .build();
- side2Rotate.angleProperty().bind(side2Angle);
-
- final Polygon side2 = PolygonBuilder.create()
- .points(x[0], y[0], x[1], y[1], x[2], y[2])
- .fill(Color.GREEN)
- .opacity(0.9)
- .transforms(side2Rotate)
- .build();
-
- final Rotate side3Rotate = RotateBuilder.create()
- .pivotX(x[1])
- .pivotY(y[1])
- .pivotZ(0)
- .axis(new Point3D(x[1] - x[2], y[1] - y[2], 0))
- .build();
- side3Rotate.angleProperty().bind(side3Angle);
-
- final Polygon side3 = PolygonBuilder.create()
- .points(x[0], y[0], x[1], y[1], x[2], y[2])
- .fill(Color.BLUE)
- .opacity(0.9)
- .transforms(side3Rotate)
- .build();
-
- final Rotate side4Rotate = RotateBuilder.create()
- .pivotX(x[2])
- .pivotY(y[2])
- .pivotZ(0)
- .axis(new Point3D(x[2] - x[0], y[2] - y[0], 0))
- .build();
- side4Rotate.angleProperty().bind(side4Angle);
-
- final Polygon side4 = PolygonBuilder.create()
- .points(x[0], y[0], x[1], y[1], x[2], y[2])
- .fill(Color.CYAN)
- .opacity(0.9)
- .transforms(side4Rotate)
- .build();
-
-
- final Rotate rootRotate = RotateBuilder.create()
- .pivotX(0)
- .pivotY(0)
- .pivotZ(-INRADIUS)
- .axis(new Point3D(1, 1, 1))
- .build();
- rootRotate.angleProperty().bind(rootAngle);
-
- return GroupBuilder.create()
- .children(side1, side2, side3, side4)
- .translateX(250)
- .translateY(250)
- .translateZ(-INRADIUS)
- .transforms(rootRotate)
- .build();
- }
-
- private void animate() {
- TimelineBuilder.create()
- .keyFrames(
- new KeyFrame(
- Duration.seconds(0),
- new KeyValue(side2Angle, 0),
- new KeyValue(side3Angle, 0),
- new KeyValue(side4Angle, 0),
- new KeyValue(rootAngle, -60)
- ),
- new KeyFrame(
- Duration.seconds(2),
- new KeyValue(side2Angle, 0),
- new KeyValue(side3Angle, 0),
- new KeyValue(side4Angle, DIHEDRAL_ANGLE),
- new KeyValue(rootAngle, 60)
- ),
- new KeyFrame(
- Duration.seconds(4),
- new KeyValue(side2Angle, 0),
- new KeyValue(side3Angle, DIHEDRAL_ANGLE),
- new KeyValue(side4Angle, DIHEDRAL_ANGLE),
- new KeyValue(rootAngle, 180)
- ),
- new KeyFrame(
- Duration.seconds(6),
- new KeyValue(side2Angle, DIHEDRAL_ANGLE),
- new KeyValue(side3Angle, DIHEDRAL_ANGLE),
- new KeyValue(side4Angle, DIHEDRAL_ANGLE),
- new KeyValue(rootAngle, 300)
- )
- )
- .build().play();
- }
- }
[video functionality removed since original publication]
Lighting, BoundingBoxes, and PerspectiveTransforms
There are a few more JavaFX features that interact well with 3D scenes. Lighting is an effect that can be applied to any Node. When applied to 3D objects, the effect is more dramatic.
Each JavaFX Node knows its bounds. As a matter of fact, each Node knows three bounds:boundsInLocal, boundsInParent, and layoutBounds. The boundsInLocal takes into account only the geometry of the Node, but not any transforms. The boundsInParent does take into account of transforms. For example, the local bounds of a rectangle is just the rectangle itself. If you don't apply any transforms, the parent bounds is the same as the local bounds. However, if you do apply transforms, say, a Rotate of 45°, then the parent bounds will become bigger to accommodate the slanted rectangle. When a Node contains 3D objects, its bounds are also 3 dimensional.
The PerspectiveTransform class is not a Transform like Translate, Scale, or Rotate. But rather it is an effect. And according to the javadoc, "Most typically PerspectiveTransform is used to provide a 'faux' three-dimensional effect for otherwise two-dimensional content."
Summary
As you can see from the experiments I made in this article, JavaFX 2.x contains easy to use facilities for building simple 3D scenes that can be used to produce quite interesting results. Although not everyone will be doing 3D scenes in JavaFX, many of JavaFX's other facilities are just as fun to use.
With JavaFX slated to be open sourced and to be tightly integrated with the JDK and JRE, it makes a lot of sense to familiarize your self with the JavaFX technologies, and have some fun while exploring them.
I would like to thank Stephen Chin, Carl Dea, and Brian Coyner for their help in reviewing this article.
References
- [1] The JavaFX Home
http://javafx.com/ - [2] JavaFX SDK download
http://www.oracle.com/technetwork/java/javafx/downloads/index.html - [3] Visage - Declarative language for expressing user interfaces
http://code.google.com/p/visage/ - [4] FX Experience blog
http://fxexperience.com/ - [5] Jim Weaver’s Rich-Client Java Blog
http://learnjavafx.typepad.com/weblog/ - [6] Steve on Java
http://steveonjava.com/ - [7] Pleasing Software
http://pleasingsoftware.blogspot.com/ - [8] Weiqi Gao's Observations
http://www.weiqigao.com/blog/ - [9] Carl's FX Blog
http://carlfx.wordpress.com/ - [10] Pro JavaFX 2: A Definitive Guide to Rich Clients with Java Technology by James Weaver, Weiqi Gao, Stephen Chin, Dean Iverson and Johan Vos
http://www.apress.com/9781430268727 - [11] JavaFX 2.0 Introduction by Example by Carl Dea
http://www.apress.com/9781430242574 - [12] Simple 3D Cubes in JavaFX 2.0 by Jasper Potts
http://fxexperience.com/2011/05/simple-3d-cubes-in-javafx-2-0/ - [13] Platonic solid
http://en.wikipedia.org/wiki/Platonic_solid
